- UI element sizing由於 10-foot environment 加上用戶坐的比較遠,並利用 remote control / gamepad 在操作,需避免讓畫面太混亂,讓用戶能輕易的導覽到需要的元素 (簡潔的畫面是重點) 。
- scale factor and adaptive layout在 PC/Mobile 可利用 settings > system > display 去調整 scale factor,檢查 UI 在不同 DPI 時是否有跑掉的部分 (Xbox 不支援)。以 Xbox 爲例,預設在 XAML 是 200% 比例 (HTML app 是 150%),就可以從 100% 加以調整或是根據 adaptive techniques 來調整畫面。
開發 Xbox App 只需要在一個解析度:1920x1080,不論用戶使用再好的 TV 還是會走到 1080p 的比例,App 也會被系統自動放大到適合的 size。 - content density設計 UI 時要注意用戶使用 remote control / gamepad 不像 touch/mouse 這樣容易,所以物件的大小(Sizes of UI controls)與點擊的次數(Number of clicks)是很重要的。如下:
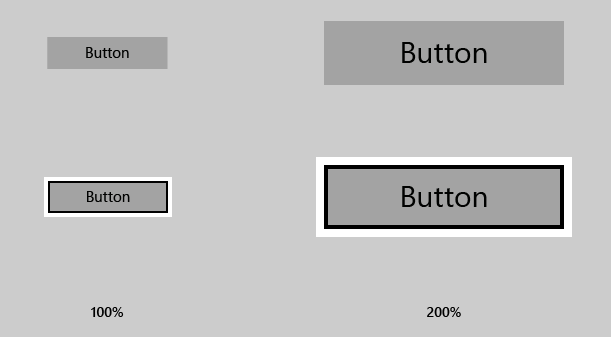
確保元件在遠距離也能被看到,需把 focus 做的明顯。
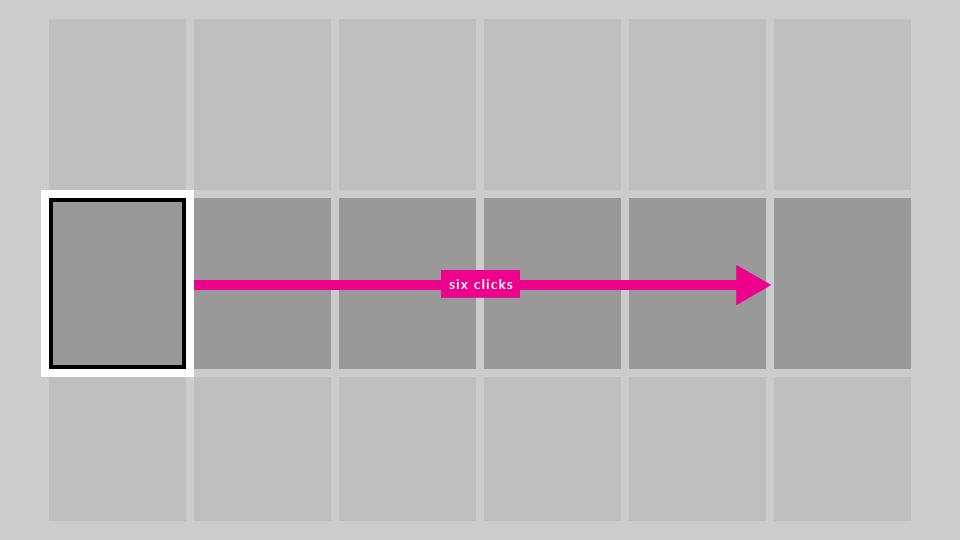
點擊次數代表用戶要完成或選擇一個元素需要點擊多少次數才能達到,如上圖要點擊 6 次才能選擇到,可以重新設計出最短距離來完成,詳細可以參考 Path of least clicks。 - text sizes爲了確保文字能在固定距離也能被看到,可參考 主要文字與閲讀内文,使用: 15 epx minimum;非主要文字或是説明内容,使用 12 epx minimum。
- Opting out of scale factor微軟建議我們使用 advantage of scale factor 去維持畫面比例的縮放,但是您也可以選擇永遠維持在 100% 比例 (當關閉 advantage of scale factor 就只能設定 100%)的呈現,如下:
如果成功關閉會得到 result = true,更多訊息可參考 How to turn off scaling。需注意計算比例如果是 XAML 要乘 2.0, 如果是 HTML 要乘 1.5。bool result = Windows.UI.ViewManagement.ApplicationViewScaling.TrySetDisableLayoutScaling(true);
- scale factor and adaptive layout
- TV-safe area由於歷史與技術原因,並非所有電視都把内容全部顯示到螢幕的邊緣。
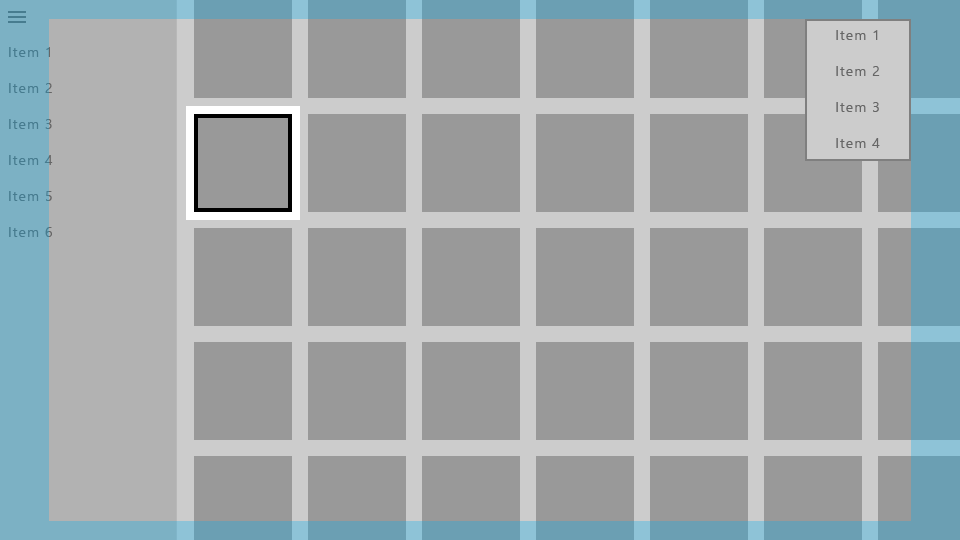
預設 UWP 自動避免在 unsafe 區域顯示内容,在 unsafe 的部分會顯示頁面的背景圖或顔色。如下圖:
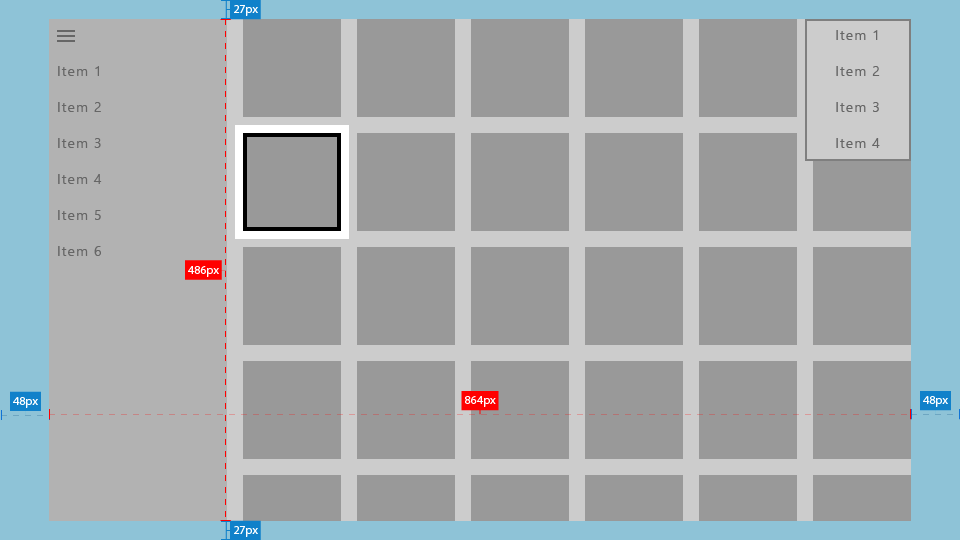
可以看到邊界就留了 (48,27,48,27),需注意隨著電視調整解析度顯示的效果有所不同,但是不會離這個數值太多。
另外可設定 Theme color 或是 Image去調整 Page 邊界的顯示:
在還沒有調整前將 App deploy 到 Xbox 會看到類似如下的圖:// 直接使用 ThemeResource 的内建主題 <Page x:Class="MySample1.MainPage" Background="{ThemeResource ApplicationPageBackgroundThemeBrush}"/> // 設定圖片為背景 <Page x:Class="MySample1.MainPage" Background="\Assets\AppBackground.png"/>
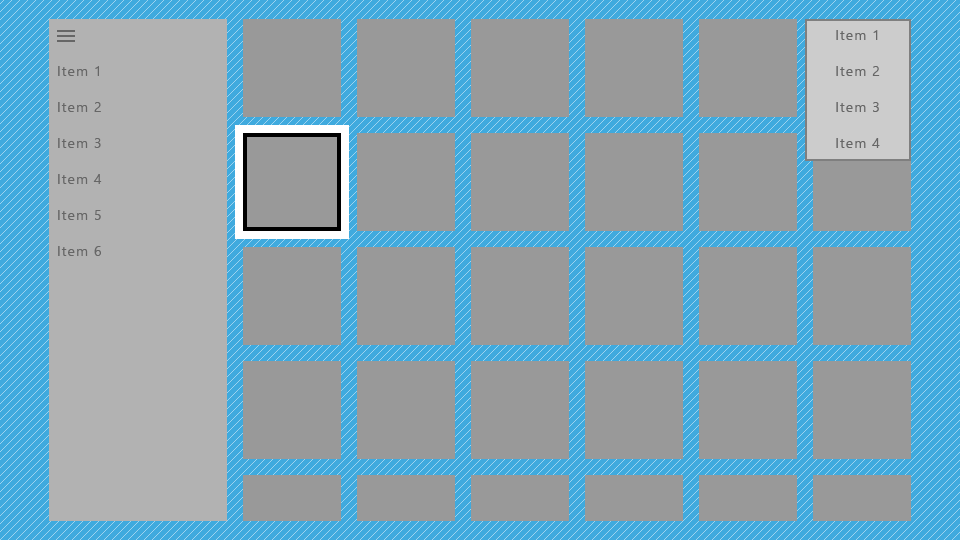
看起來會感覺好像盒子裏面又有盒子一樣的曡層效果,這個是可以調整的。微軟建議使用 ScrollViewers, nav panes或 CommandBars 來延伸内容到邊界。避免因爲邊界問題(48,27,48,27)造成内容顯示被電視截斷或是看不到。
下面介紹幾個調整方式:
- Core window boundsUWP 爲了 10-foot experience,直接設定 window bound 是最簡單的方式。直接在 App.xaml.cs 的 OnLaunched 加入下面的 code:
加入這段 code 之後,app 的 window 會延伸到 TV 的邊界:Windows.UI.ViewManagement.ApplicationView.GetForCurrentView().SetDesiredBoundsMode (Windows.UI.ViewManagement.ApplicationViewBoundsMode.UseCoreWindow);
我們就需要調整所有可以互動的 UI 元件到 TV-safe area。 - Pane backgrounds由於 navigation panes 接近 TV-safe area 邊界,避免漏出畫面邊界綫,可以把 navigation panes 的背景色設定特定顔色後,再設定 margins 讓畫面呈現在 TV-safe area 裏面,如 code:
效果如下圖:<SplitView x:Name="RootSplitView" Margin="48,0,48,0"> <SplitView.Pane> <ListView x:Name="NavMenuList" ContainerContentChanging="NavMenuItemContainerContentChanging" ItemContainerStyle="{StaticResource NavMenuItemContainerStyle}" ItemTemplate="{StaticResource NavMenuItemTemplate}" ItemInvoked="NavMenuList_ItemInvoked" ItemsSource="{Binding NavMenuListItems}"/> </SplitView.Pane> <Frame x:Name="frame" Navigating="OnNavigatingToPage" Navigated="OnNavigatedToPage"/> </SplitView>
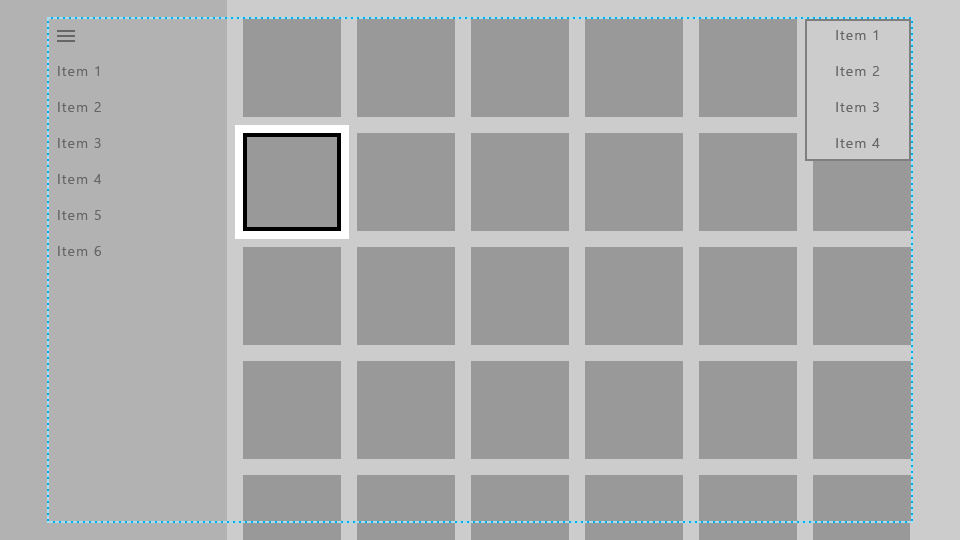
如果您的 App 有用到 CommandBar 的話,可藉由設定 background 顔色,例如:如果是 top command bar 可以用透明色(transparent)讓它跟 Page 同色效果像是浮在畫面上;如果是 below command bar 就填滿顔色讓它變成是底部的感覺。
- Scrolling ends of lists and grids使用 ListView 或 GridView 元件是常用到的,他們可以裝比畫面顯示更多的内容,此時會利用 gamepad 水平移動到最右邊移動到最後一個,或是垂直移動到底部的最後一個。
但是移動時 focus 在 TV-safe area 也是要特別處理的,才能做到如下的圖,避開 focus 到一個被畫面切掉的 UI:

由於 UWP 具有將 focus 顯示于 VisibleBounds 内部的功能,因此需要去設定容器(ListView 或 GridView) ItemsPresenter 的 margin,
// 建立一個 Style
<Style x:Key="TitleSafeListViewStyle"
       TargetType="ListView">
    <Setter Property="Template">
        <Setter.Value>
            <ControlTemplate TargetType="ListView">
                <Border BorderBrush="{TemplateBinding BorderBrush}"
                        Background="{TemplateBinding Background}"
                        BorderThickness="{TemplateBinding BorderThickness}">
                    <ScrollViewer x:Name="ScrollViewer"
                                  TabNavigation="{TemplateBinding TabNavigation}"
                                  HorizontalScrollMode="{TemplateBinding ScrollViewer.HorizontalScrollMode}"
                                  HorizontalScrollBarVisibility="{TemplateBinding ScrollViewer.HorizontalScrollBarVisibility}"
                                  IsHorizontalScrollChainingEnabled="{TemplateBinding ScrollViewer.IsHorizontalScrollChainingEnabled}"
                                  VerticalScrollMode="{TemplateBinding ScrollViewer.VerticalScrollMode}"
                                  VerticalScrollBarVisibility="{TemplateBinding ScrollViewer.VerticalScrollBarVisibility}"
                                  IsVerticalScrollChainingEnabled="{TemplateBinding ScrollViewer.IsVerticalScrollChainingEnabled}"
                                  IsHorizontalRailEnabled="{TemplateBinding ScrollViewer.IsHorizontalRailEnabled}"
                                  IsVerticalRailEnabled="{TemplateBinding ScrollViewer.IsVerticalRailEnabled}"
                                  ZoomMode="{TemplateBinding ScrollViewer.ZoomMode}"
                                  IsDeferredScrollingEnabled="{TemplateBinding ScrollViewer.IsDeferredScrollingEnabled}"
                                  BringIntoViewOnFocusChange="{TemplateBinding ScrollViewer.BringIntoViewOnFocusChange}"
                                  AutomationProperties.AccessibilityView="Raw">
                        <ItemsPresenter Header="{TemplateBinding Header}"
                                        HeaderTemplate="{TemplateBinding HeaderTemplate}"
                                        HeaderTransitions="{TemplateBinding HeaderTransitions}"
                                        Footer="{TemplateBinding Footer}"
                                        FooterTemplate="{TemplateBinding FooterTemplate}"
                                        FooterTransitions="{TemplateBinding FooterTransitions}"
                                        Padding="{TemplateBinding Padding}"
                                        Margin="0,27,0,27"/>
                    </ScrollViewer>
                </Border>
            </ControlTemplate>
        </Setter.Value>
    </Setter>
</Style>

// 套用在 ListView 或是 GridView 讓 ItemsPresenter 能保留 TV-safe area 需要的間距
<ListView Style="{StaticResource TitleSafeListViewStyle}" />
- Core window bounds
- Colors預設 UWP 會自動把 App 的顔色調整到適合 TV-safe colors 的範圍,讓 App 在任何一台電視看起來是正常的。當然我們也可以修改成自己喜歡的顔色,但是要注意並不是什麽顔色都適合在電視上顯示。
最簡單是使用 Application theme,讓 App 根據系統設定的主題來套用顔色,但是很可惜 Xbox 爲了確保顔色都能在任何電視呈現,預設使用黑色(dark)的主題。
既然主題色無法調整,在 Xbox 還有 Accent color 可以控制,需注意 Accent color 是跟著 User 不是系統,因爲 Xbox 可以設定多個 User 他們分別可以使用不同的顔色,這個跟 PC/Mobile 不一樣。
透過 Color themes 看到 Xbox 推薦的 Accent color,App 中可在 brush / colors resources 中使用它們,例如:SystemControlForegroundAccentBrush 或是 SystemAccentColor,或是直接使用 UIColorType.Accent 選擇要用的顔色。
TV-safe color
由於電視會有色差(Color variance among TVs),因此設計出來的顔色有可能與你在顯示器不一樣,建議不要用顔色做内容的差異,因爲會容易造成用戶混肴。
既然如此,文章裏就提供了 TV-safe color 讓我們參考,如下圖:
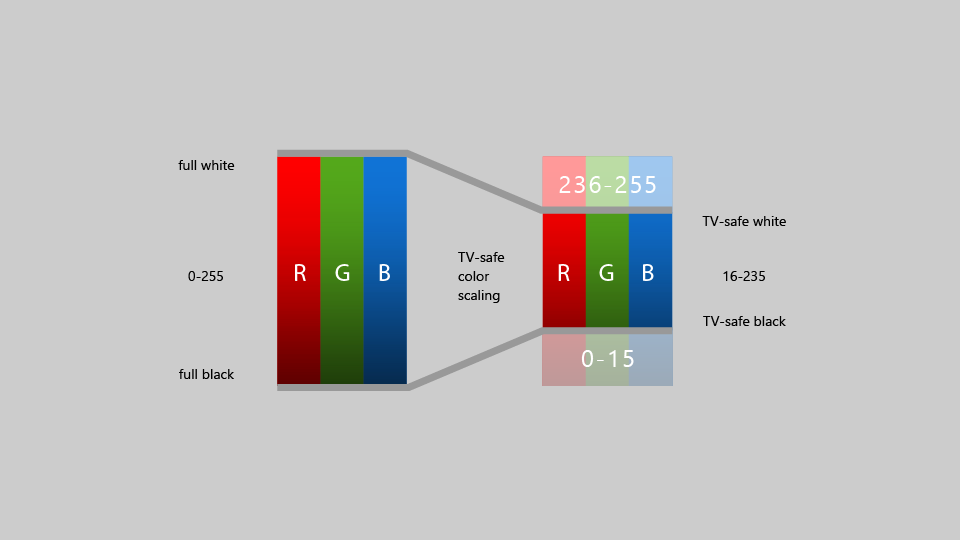
電視不會處理極端的顔色,因爲它會造成顔色的帶狀效應 (odd banded effect) 或是某些顔色就消失了,甚至有些極端顔色會變成一樣的顔色。
因爲不同電視廠商處理顔色的方式不同,因此,RGB 顔色在 16-235(或 10-EB 16 進位) 範圍内是最安全的。
但是有一個好消息,就是更新到 Fall Creators Update,Xbox 會自動處理 color full range 到 TV-safe range。
注意
- 如果您開發的 App 使用到 DirectX 11 或 DirectX 12 來畫 UI 或影片,必須利用 IDXGISwapChain3::SetColorSpace1 設定顔色空間,讓系統知道是否要縮放顔色。
- 如果 played back 利用 Media Foundation 在 TV-safe color 裏面播放影片時不會有顔色縮放效果。
- Sound在 10-foot experience 中聲音播放扮演很重要的角色,例如:用戶利用 gamepad 導覽到控制項會自動發出 focus 的音效。
可以幫助用戶更快找到自己目前的動作位置。在 UWP 程式在 Xbox 運行時會自動打開控制項的音效。
開啓音效原件是: ElementSoundPlayer,利用下面的 code 説明:
詳細可以參考 Sound。// 設定開啓控制項的音效,如果是在 Xbox 預設是 ElementSoundPlayerState.Auto ElementSoundPlayer.State = ElementSoundPlayerState.On; // 設定音量 ElementSoundPlayer.Volume = 0.5; // XAML sample <Button Name="ButtonName" Content="More Info" ElementSoundMode="Off"/> // in code , ElementSoundKind 有多種可用的内建音效 ElementSoundPlayer.Play(ElementSoundKind.Invoke);
- Guidelines for UI controls文件裏提到幾個在 10-foot experience (on TV) 時需要注意的元件:
- Pivot controlPivot 提供快速切換到不同 headers 或是 tabs 下的内容,會有 underline 標記現在在那個 tab。
可以藉由設定 Pivot.IsHeaderItemsCarouselEnabled = true 去保持用戶最後選擇的 tab,而不用每次回畫面都要重第一個開始選擇。
這個對 TV 上的操作很重要,如果遇到 tabs 過多時,這樣可幫助用戶繼續上一步任務不需要重新選擇。更多可參考 Tabs and pivots.。 - Navigation panenavigation pane(或是大家說的漢堡按鈕)在 UWP app 很常被使用,通常 pane 一開始都是被收起來節省畫面空間,用戶去點擊漢堡才會打開 pane。
利用 touch/mouse 很容易,但是 gamepad/remote control 就很難去選到那個位置。
因此官方建議處理 gamepad 上面的 view button,讓用戶直接按下那個按鈕就可以開啓 pane,可以參考 Managing focus navigation。
- CommandBarCommandBar 預設按鈕的文字是顯示在下方,這樣的顯示方式不適合在 10-foot experience,因爲用戶距離太遠不容易看到下面的文字。
因此,建議設定為 CommandBarDefaultLabelPosition.Right 呈現如下的效果:

幫助用戶能更清楚看到該按鈕的説明。 - TooltipTooltip 比較常見是在 mouse over 的時候會顯示,但是 Xbox 使用 gamepad/remote control 操作其實不需要,因爲用戶很快就會 navigation 過去。建議只對特定的元件在做 tooltip 就好,例如: Nested UI elements。
- Button styles預設 Button style 在 10-foot experience 可以做一些調整,讓它被 focus 的時候可以更明顯,更多説明可以參考 Button。
- Nested UI elementsXY navigation 幫助 focus 設定,讓用戶能夠知道目前 focus 的位置。如果您的 App 用到 ContextFlyout 建議在顯示 Flyout item 時自動設定 focus 到裏面的項目,並且處理 B button or Back button 時,能夠正確回到顯示 Flyout 之前的元件。詳細可以參考 Nested UI in list items.。
另外我自己比較建議在 Xbox 或是 TV 上遇到 Nested UI in list items 的設計,搭配 gamepad 按鈕的 hint,讓減少用戶需要 navigation 的次數。 - MediaTransportControlsMediaTransportControls element 幫助用戶控制播放媒體(play, pause, ...)。這個功能支援 MediaPlayerElement,但是它需要在 Windows 10, version 1607 and later,如果是比較舊的版本請使用 MediaElement 的 TransportControls。
MediaTransportControls 具有兩種樣式 one-row 與 two-row,在 Xbox 上面較適合 two-row 如下圖:

設定方式:
<MediaPlayerElement x:Name="mediaPlayerElement1" Source="Assets/video.mp4" AreTransportControlsEnabled="True"> <MediaPlayerElement.TransportControls> <MediaTransportControls IsCompact="False"/> </MediaPlayerElement.TransportControls> </MediaPlayerElement> - Search experience搜尋内容在 10-foot experience 是很常使用的功能。如果您的 App 也有提供這樣的功能,微軟建議您加入 gamdped 上 Y button 的處理,讓用戶按下 Y 自動進去搜尋模式。
如果您的 App 已經預期用 Y 按鈕做其他事情,那您可以使用 Segoe Xbox MDL2 Symbol(only for Xbox) 字形在 Button 或是 TextBlock 畫上搜尋符號 ( for XAML app;\E426 for HTML app)。
當然,如果希望其他設備也可以使用的話,我建議你改用下面的 code:
另外建議搜尋畫面在進入時自動 focus 到輸入框,讓鍵盤自動升起搭配 AutoSuggestTextBox 把建議字一並顯示,加速用戶找到需要的内容。<TextBlock Text="" FontFamily="Segoe MDL2 Assets" />
- Pivot control
- Custom visual state trigger for Xbox搭配自定義的 visual state trigger 讓用戶在操作上感覺 UI 的變化。
例如:繼承 StateTriggerBase 判斷是否為 Xbox 設備,如果是做 UI 的調整,如下面的 code:
- 自定義一個 StateTrigger:
class DeviceFamilyTrigger : StateTriggerBase { private string _currentDeviceFamily, _queriedDeviceFamily; public string DeviceFamily { get { return _queriedDeviceFamily; } set { _queriedDeviceFamily = value; // Windows.Xbox _currentDeviceFamily = AnalyticsInfo.VersionInfo.DeviceFamily; // 檢查如果是的話回傳 true, 代表觸發 trigger SetActive(_queriedDeviceFamily == _currentDeviceFamily); } } } - 在 XAML 中定義 VisualState.StateTrigger 使用自定義的 triggers:DeviceFamilyTrigger 是 Xbox 設備,如下範例:
<VisualStateManager.VisualStateGroups>
    <VisualStateGroup>
        <VisualState>
            <VisualState.StateTriggers>
                <triggers:DeviceFamilyTrigger DeviceFamily="Windows.Xbox"/>
            </VisualState.StateTriggers>
            <VisualState.Setters>
                <Setter Target="RootSplitView.OpenPaneLength"
                        Value="368"/>
                <Setter Target="RootSplitView.CompactPaneLength"
                        Value="96"/>
                <Setter Target="NavMenuList.Margin"
                        Value="0,75,0,27"/>
                <Setter Target="Frame.Margin"
                        Value="0,27,48,27"/>
                <Setter Target="NavMenuList.ItemContainerStyle"
                        Value="{StaticResource NavMenuItemContainerXboxStyle}"/>
            </VisualState.Setters>
        </VisualState>
    </VisualStateGroup>
</VisualStateManager.VisualStateGroups>
- 自定義一個 StateTrigger:
- Xbox best practices開發時的 cookbook。
- Using Speech to Invoke UI Elements可以利用語音的方式控制 App 裏的 UI Elements
- System resources for UWP apps and games on Xbox One一個 App 最大記憶體量是 1G,如果退到背景模式只剩下 128 MB,如果是做音樂 App 特別注意避免 App 被系統停止。
- UWP features not yet supported on Xbox有些 APIs 不一定又支援 Xbox,這篇要記得看。
- 一次設定 TV-safe size 與 TV-safe color:
void OnLaunched(LaunchActivatedEventArgs e)
{
    if (App.IsXbox())
    {
        // use TV colorsafe values
        this.Resources.MergedDictionaries.Add(new ResourceDictionary
        {
            Source = new Uri("ms-appx:///TvSafeColors.xaml")
        });

        // remote TV safe areas
        ApplicationView.GetForCurrentView().SetDesiredBoundsMode(ApplicationViewBoundsMode.UseCoreWindow);
    }
}
開發 Xbox 上面的應用畫面真的需要重新設計符合電視的操作會比較好,相對地,畫面的不同建議 ViewModel 也要重新設計,
減少原本因爲要通用在 Desktop/Mobile 上的使用造成資源的浪費。
希望這兩篇的介紹可以幫忙大家更瞭解 Xbox 開發應用需要注意的地方。
References:
- UWP on Xbox One(重要)
- What's new for developers in the latest update of UWP on Xbox One/li>
- Designing for Xbox and TV(重要)
- UWP features that aren't yet supported on Xbox
- disable mouse mode
- Focus visual
- TV-safe area
- How to draw UI to the edge of the screen
- Read Colors to understand how to make your app look great to everybody!
- Building Great Universal Windows Platform (UWP) Apps for Xbox
- Adapt Your App for Xbox One and TV
- UWP Development 1: Building an Adaptive UI
- Web Apps Beyond the Browser: Cross-Platform Meets Cross Device
- System resources for UWP apps and games on Xbox One
- Introduction to multi-user applications
- How to use Fiddler with Xbox One when developing for UWP
- Developing Xbox One Applications
- UWP on Xbox One samples
- Keyboard interactions
沒有留言:
張貼留言